You have a powerful pretrained artificial intelligence model ready to tackle complex language or vision tasks. But how do you make it excel on your specific, niche data? The answer lies in fine tuning, a technique that adapts these general purpose giants to your unique needs. When it comes to building and refining these intelligent systems, PyTorch stands out as an incredibly flexible and developer friendly framework. Let’s explore the art of fine tuning with PyTorch.
Why PyTorch for Fine-Tuning?
PyTorch’s intuitive design and dynamic computation graph make it a favorite for researchers and developers. For fine tuning, this flexibility is a huge advantage. You can easily load a pretrained model, inspect its architecture, and modify specific parts, especially the final output layer, to fit your new task specific requirements. Its robust ecosystem also provides excellent tools for data handling and optimization, simplifying the entire process.
The PyTorch Fine-Tuning Workflow
Fine tuning a pretrained neural network in PyTorch generally follows a clear sequence of steps:
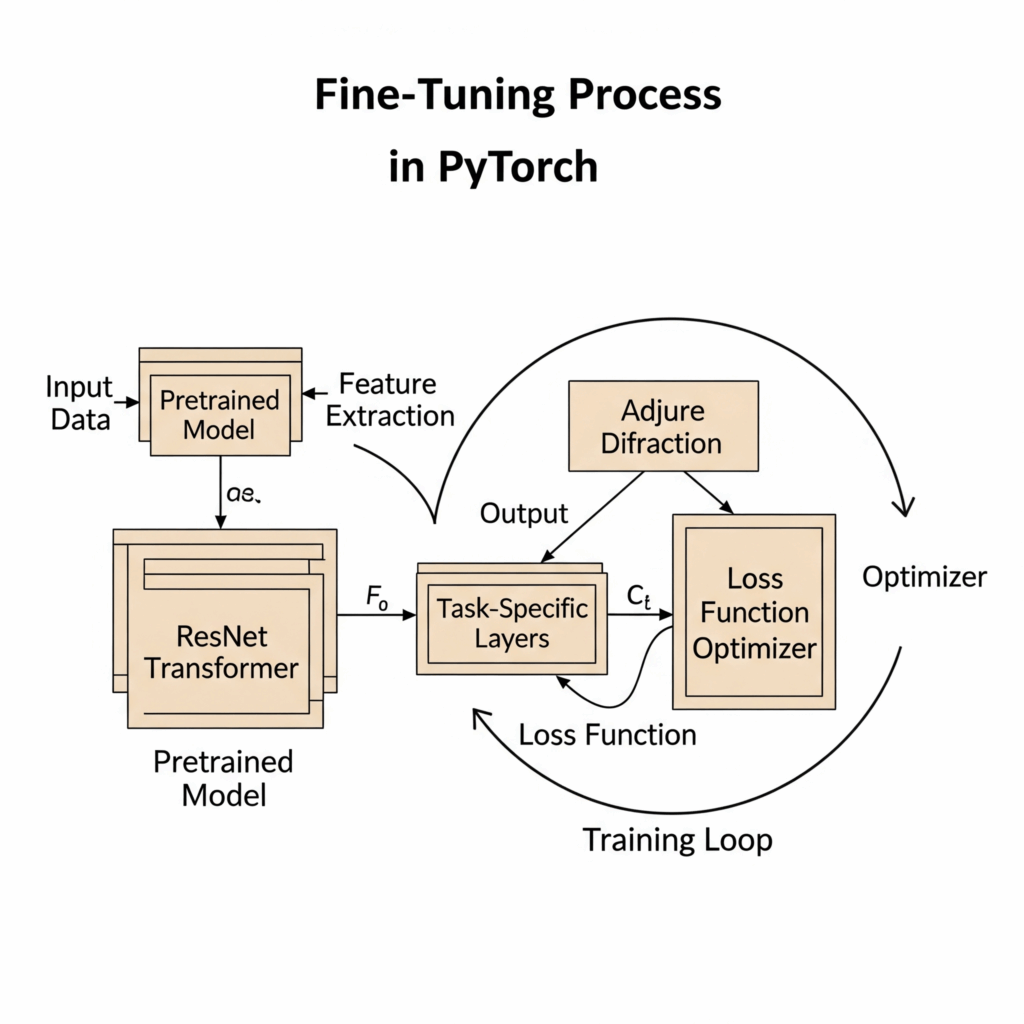
- Load a Pretrained Model: The first step is to bring in a model that has already learned rich representations from vast datasets. For vision tasks, you might load a ResNet from
torchvision.models. For natural language processing, models like BERT or GPT are readily available through libraries such as Hugging Face Transformers. PyTorch makes this simple with functions likefrom_pretrained. - Prepare Your Dataset: Your own specific data is crucial. You will organize your data into a dataset object, and then use a dataloader to efficiently feed batches of this data into your model during training. This ensures your model sees a diverse range of examples.
- Adapt the Model’s Head: Pretrained models typically have an output layer designed for their original pretraining task. For example, a sentiment analysis task needs two output classes (positive or negative), while a language translation task might require a large vocabulary output. You will replace or modify this final layer to match the number of classes or outputs for your new task. You might even choose to “freeze” earlier frozen layers initially, preventing their weights from changing much, and only train the newly added layers.
- Set Up the Training Components: Just like any other neural network training, you need:
- A loss function to measure how well your model performs (e.g.,
nn.CrossEntropyLossfor classification). - An optimizer to adjust the model’s weights (e.g.,
torch.optim.AdamW). - A carefully chosen learning rate. Fine tuning usually benefits from a very small learning rate, as you are subtly adjusting an already powerful model, not training from scratch.
- A loss function to measure how well your model performs (e.g.,
- Implement the Training Loop: This is the core of the fine-tuning process. You will iterate through your dataloader, performing a forward pass to get predictions, calculating the loss function, performing a backward pass to compute gradients, and finally using the optimizer to update the model’s parameters. Using a GPU is highly recommended for speed. Remember to set
model.train()for training andmodel.eval()for evaluation. - Evaluate the Fine-Tuned Model: Regularly evaluate your fine-tuned model on a separate validation set to monitor its performance and prevent overfitting. This helps ensure your model generalizes well to unseen data.
Key Considerations for Success
Successful fine tuning requires attention to detail. A low learning rate is paramount to avoid corrupting the pretrained knowledge. Experimenting with different learning rate schedulers can also yield better results. While full fine tuning updates all parameters, techniques like Parameter Efficient Fine Tuning (PEFT), which you might encounter in more advanced scenarios, allow you to train only a small fraction of parameters while keeping the large pretrained model mostly frozen layers, saving significant computational resources.